
Diamond Dotz is a very fun and addictive craft where you create stunning shimmery designs by positioning tiny shaped tiles Diamond Dotz onto a preprinted canvas. It's just like painting by numbers or counted cross stitch. The process of picking up the Dotz and placing them on the canvas is easy, relaxing and you can finish even a large canvas in just a few days which makes it very satisfying!
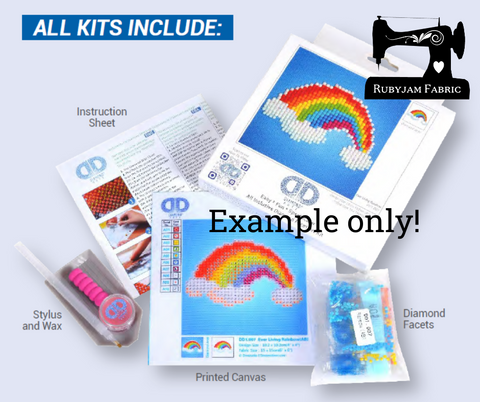
Our Diamond Dotz kits contain everything you need to complete your Dotz masterpiece including step by step instructions. Unpack the kit and flatten your canvas before starting by rolling it out in the opposite direction, hold for 30 seconds then lay it flat.
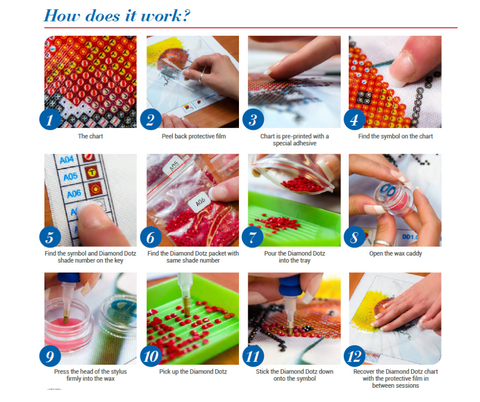
You'll notice that your canvas has a protective plastic sheet over the top of it. Don't remove it yet! You only need to lift a small section of the plastic sheet at a time so your hand doesn't stick to the canvas and so you can roll up your unfinished artwork to store in between "painting" sessions.
Take a look at your colour chart - just like a cross stitch pattern, each colour has a corresponding code and these codes are on your Dotz bags. Select your first Dotz colour - we recommend starting at the top of the design and working your way across (either left to right or right to left) then gradually towards the bottom of the design. This is so you're not leaning over or resting your arm on the finished section. Work in small areas at a time, peeling only 2-3 inches of the protective sheet back. You can smooth the sheet back over if you need to take a break.
Ok, you're ready to start your Diamond Dotz masterpiece!
Once you have chosen the Diamond Dotz colour to start with, pour those Dotz into the tray being careful not to overfill it, then open the wax container. Press the stylus head into the wax and then press it onto the ROUNDED side of a Dotz in the tray. The Dotz will hold onto the wax allowing you to press the flat side onto the corresponding symbol on your canvas. Viola!
Tip:
To help flip your Dotz so the rounded side is up, gently shake your tray from side to side. This will help the Dotz settle into the grooves in the tray with the flat side down. Try not to overfill the tray, it's easier to work with less Dotz in the tray than too many.
To store your Dotz artwork either completed or unfinished by simply roll it up with the Dotz facing inwards.
Don't discard your left over Dotz - you can use them to decorate coasters, mirrors, phone covers, hair accessories, in cardmaking and scrapbooking.